Table of Contents
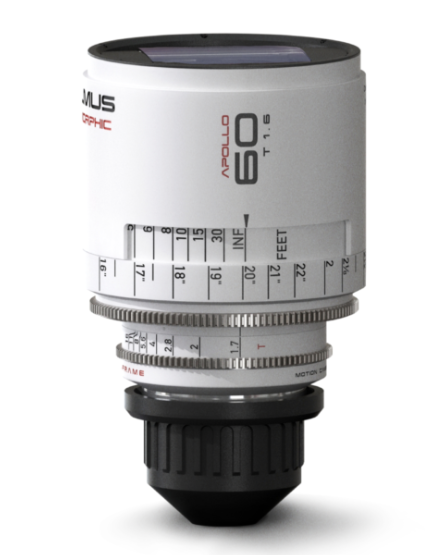
Xelmus Optics Apollo 60mm T1.6
Summary
One of the main features of the Apollo lenses is the anti-mump system created in 1954 by Mr. Gottschalk from Panavision. With that system, whilst focusing from infinity to the close point, the image stretches only in a vertical direction (vertical breath), the horizontal axis stays locked. That’s the beauty of this focusing system. The optics are much smaller than a front variable diopter design system, which means they are lighter weight, with less chromatic aberrations, and have better light transmission. The Apollo lenses are amazing for steadicams, gimbals, and handheld work. The Focus ring mechanics are a cam based design. They allow the focus ring to be really smooth, and feature a rotation of 270°. It features standard pitch module of 0.8. for both focus and aperture rings. All the lenses from Apollo series shares 14 round-blades circular apertures! And let’s not forget about the color! The white matches the lens name – Apollo, just like NASA! And we gotta say it looks beautiful. Red-White-Black – are the main colors of the Apollo lens series.
Tech Specs
| Manufacturer | Xelmus Optics |
| Series | Anamorphic |
| Model | Apollo |
| Focal Length | 60mm |
| Max Aperture | T1.6 |
| Min Aperture | T22 |
| Format | Full Frame |
| Image Circle | 43×37 |
| Minimum Focus | 16.5in |
| Focus Rotation | 270 |
| Iris Blades | 14 |
| Optical Design | - |
| Squeeze | 2X |
| Front Diameter | 104mm |
| Filter Thread | none |
| Focus/Zoom Rod | n/a |
| Native Mount | PL |
| Data Protocol | none |
| Length | 5.27in |
| Weight | 1.8kg |
| Body Telescope | none |
| Body Material | Aluminum |
| Focus Drive | Manual |
| Iris Drive | Manual |
| Zoom Drive | n/a |
History
Country of Origin: -
Release Date: -
Launch Price: -
Design Revisions:
Service
This section restricted to Duclos Staff users.
Known Issues:
1. Collimation: mark accuracy is “loose” at best. Lens should be accurate at infinity, and reach the close focus stop. Marks in between may be slightly off. Explanation from Xelmus about this:
“we didn’t use shims so you have to adjust spherical with this white ring but actually we adjusted to Alexa correct distance so if nobody shifted you’re gonna have to adjust the spherical element. Also you have don’t look at the focus marks you have to find the best focus at close and infinity just. For example it could be like great focusing till 3m, and infinity is a little might be a little off, but that’s fine, so you’re just a do it with compromises but oh, if you need correct marks you can print them and put it on the ring. This way you will have correct mark”
Service Manual: Disassembly/Re-assembly
Full CLA: TBD - quote investigation for 5-8 hrs.
Enter relevant notes here
Replace front element: 2-3 hrs.
The front element is epoxied in place (RTV) and accessing it will disturb twist and horz./vert. lines. Remove front engraved ring via 6 screws at front. FOR THE 24mm ONLY: Remove the focus scale and then the two front element retaining wedges via four screws on the back of the front group, then carefully cut the silicone RTV from around the front element in order to remove it.
ALL OTHER FOCAL LENGTHS: Remove screws holding front group to lens (this can be tricky due to awkward location of screws. Using a ball hex and removing focus scale can help slightly in this. Also, some screws are longer than others, so take note where each goes). Remove screw (if present) on steel guide rail where the triangular astigmatizer rides. The front group should now be free. If you removed the focus scale, it can be used as a holder so the FE doesn't contact your working surface. Remove the two-piece aluminum and plastic “wedges” that reside on the two short sides of the front element by removing the four hex screws on the back side (when re-installing these, be careful not to over tighten them as you could crack the FE). Using a razor, carefully cut the RTV along the long edges of the FE. This process is super annoying. The front element is very thin at the middle, so take caution when pulling with suction cups if you intend on re-using the element. Caution: The middle cylinder should be taped in, but in most cases the weak tape has come loose and is just held in with the front element and can easily fall out. The first two cylinders come out to the front, the rear cylinder comes out to the rear.
Adjust Twist: TBD - quote investigation for 5-8 hrs.
after taking the front shell off you should have screws to adjust the front cylinder for simple twist. If it's not that simple it is an issue with the astigmatizers. Apparently with the Xelmus there is a prime spacing issue that is difficult to adjust and will just go out on its own.
Clean front optics: 2-4 hrs.
front element is epoxied in (RTV) and the middle cylinder is held in with tape but can't be removed without first removing the FE. The third cylinder can be removed from the rear via screws once the front group is removed from the main chassis. See detailed notes above.
Tighten focus hard stop: 2-6 hrs.
If the hard stop (JCIS screw with delrin stop material) is loose, you can tighten it by removing the focus scale and tighten the screw using a specially bent driver. Quote low. However, if the stop screw hole is stripped and needs to be repaired, the focus cam/assembly must be removed.Quote high
…end of Staff section